

Parameterizing configurations for reusable YAML
A guided walkthrough to define and use parameterized configurations in telflo.
In a previous article we learned how to deploy an OpenTelemetry collector on a Linux server to move logs from our log-generator-dev server into our observability-dev server. To acheive this we defined an OpenTelemetry configuration in the telflo editor which contained a hard coded endpoint to our Loki receiver IP.

This all worked (Yay!), but what if we wanted to deploy the same configuration to our prod servers? There are a couple of ways we could achieve this (spoiler: none of these are great)
- Duplicate the Configuration: We could navigate to the Configuration page in telflo, open the "starfeuds logging" configuration, copy the YAML, then create a new Configuration named "starfeuds logging prod", paste the configuration in the YAML editor, and finally create a new deployment setting "starfeuds logging prod" as the configuration to serve. Look, we're all professionals here so I don't need to explain why that's a bad idea. Everyone reading this should have uncomfortably shaken a little.
- Publish a Duplicate Version: Similarly, we could have opened the "starfeuds logging" Configuration, clicked on the Version dropdown, selected "Create new Version" to create a copy of Version 1 (the one we published in the previous article), named it Version 2, published Version 2 to the org, and then created a new deployment specifying Version 2 as the prod configuration to serve.
Both solutions suffer the same issue: two copies of YAML being served by two different deployments to different servers. This might not be extremely offensive at first, because the current YAML is pretty simple at this point but imagine you add Filters, Redactors, Tail Sampling, and other processors to your pipeline...you've duplicated all of that and now imagine you need to adjust and deploy a new version of that pipeline to both dev and prod. It's a mess to say the least, and ripe for errors and inconsistent behaviors that increase your risk of data leaks, broken pipelines, and more.
But wait...what if I told you you could use the same Configuration definition in multiple deployments!
Cue angelic music!
Let's start by spinning up 2 additional VMs that are exact copies of the dev machines in our previous article, however I'll name them with the "prod" suffix. I can do this by following the exact same instructions in steps 1 and 2, with two minor exceptions:
- We will name our machines "observability-prod" and "log-generator-prod".
- We will map the Grafana forwarded port to 3002
ssh -L 3002:localhost:3000 login_name@<IP of observability-prod>
When finished we will have 4 VMs. These are (with my IP addresses as examples)
- observability-dev: 10.211.55.73
- log-generator-dev: 10.211.55.74
- observability-prod: 10.211.55.75
- log-generator-prod: 10.211.55.76
And if you followed the previous article and this article, up to this point, you should be able to open two browsers and navigate to "http://localhost:3001" (dev Grafana), and "http://localhost:3002" (prod Grafana).
If you recall in the previous article we moved our starfeud trooper's night out logs from log-generator-dev to observability-dev with the following configuration
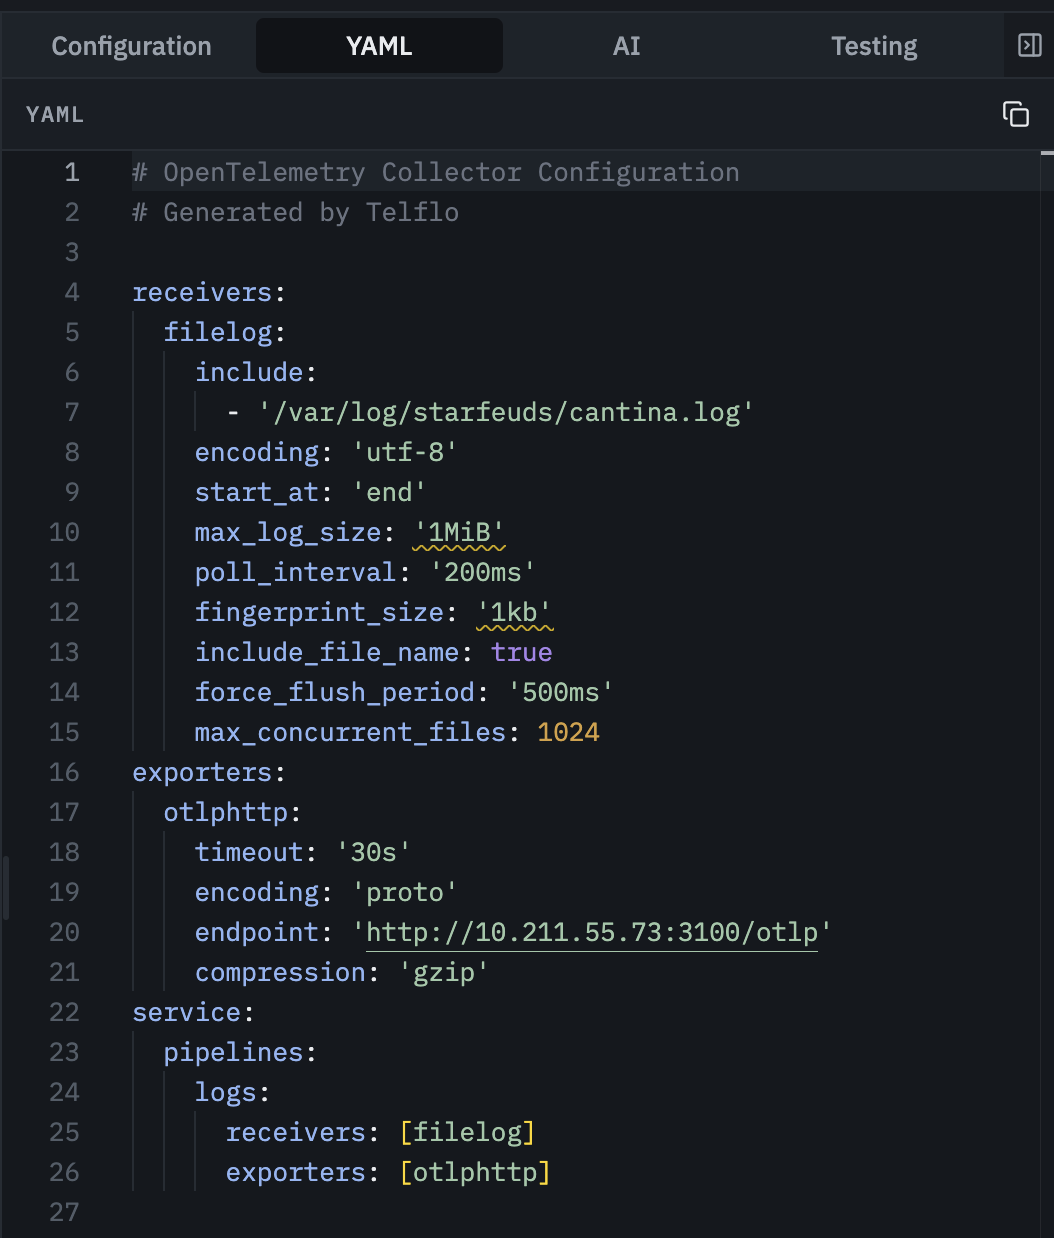
Notice that the exporters.otlphttp.endpoint value includes "10.211.55.73:3100", which is the Loki instance listening on our observability-dev platform. This won't work for our production logs because it requires a different destination IP address. But let's do something fun. Let's parameterize the YAML.
Step 1: Create the Org Variable
The first thing we need to do is define an Org Variable to represent a generic Loki Receiver endpoint. We can do that as follows.
-
In your telflo account, click on the "Vault" tab in the left menu, and then select the "Org Variables" submenu. In this tab we can define organization variables that can be used as parameters within a Configuration YAML definition.
-
Click the "+ Add Org Variable" button, and create a "Loki Receiver" variable as follows.
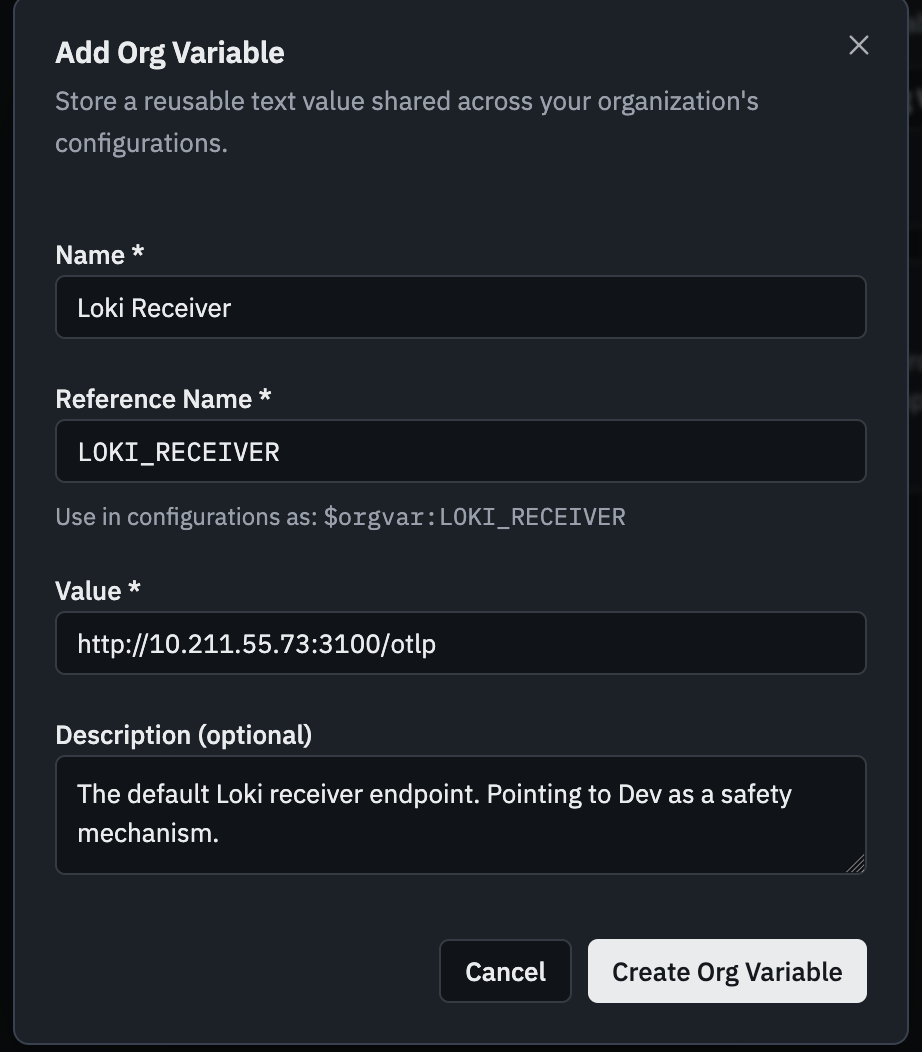
Click the "Create Org Variable" button when you're done to finish creating this variable.

The Org Variables defined on this page are the default values. They can be used as parameters in any YAML and the default value will substitute in. That will become important later. But we also need to be able to override those values. That's where "Org Variable Groups" come into play.
Step 2: Define an Org Variable Group (default value override)
Org Variable Groups allow you to define a group of Org Variables, and override their default values. This is where the real power of variables begins to show. Let's demonstrate.
-
Click on the "Org Variable Groups" submenu.
-
Click on "Add Group". Let's create a group of overrides for production, so we'll name our group "Prod".
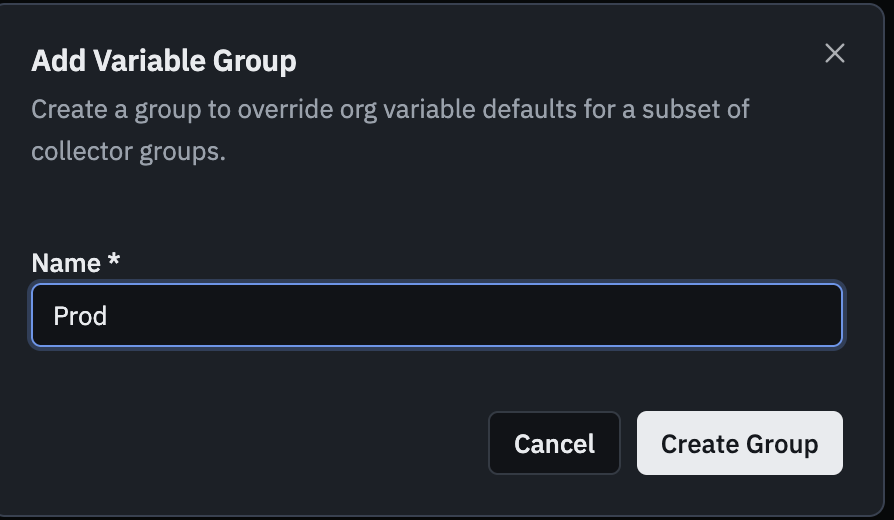
-
Click the "Create Group" button to confirm, and the group will be created.

-
With the group defined, we have an empty bucket that we can add parameters overrides to. Click on the "Prod" name in the UI to open the "Prod" variable details page. Currently it's empty meaning that there are no value overrides. Let's select a variable to override the value on. Click "Select Variables". Tick the "Loki Receiver" variable.
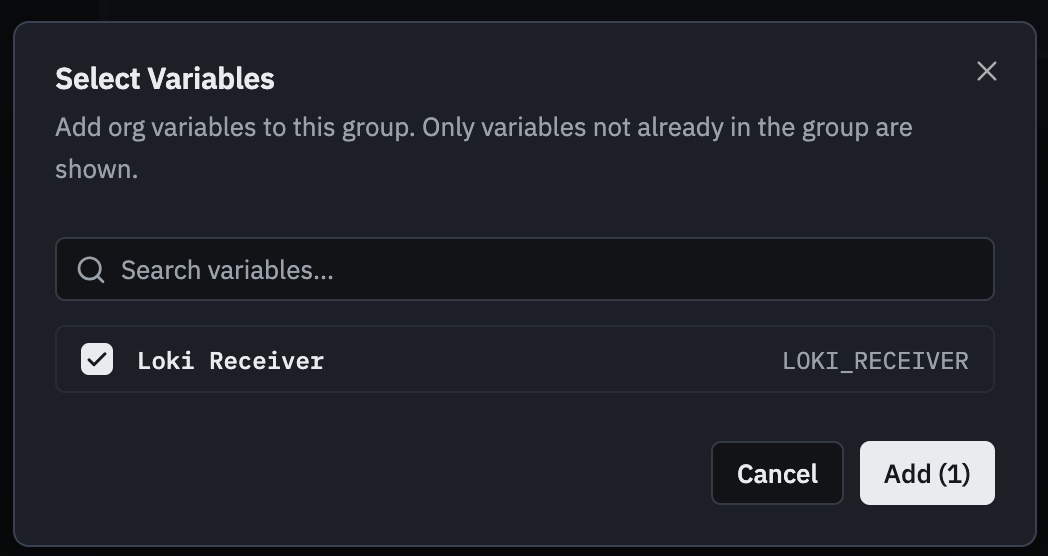
-
Click the "Add" button to confirm your choice and the Loki Receiver should appear in your list.

-
Now click the edit button to open the "Edit Override" dialog. This is where we can override the default dev Loki Receiver value (10.211.55.73:3100) with our prod value (10.211.55.75:3100).
Fantastic. Now we have 2 different values assigned to 1 variable. But we haven't actually assigned the variable to anything. Let's fix that right now.
Step 3: Parameterize the YAML
Let's return to the configuration visual editor.
-
In the left side menu, click "Configurations" and then click "starfeuds logging". You should navigate to the simple pipeline we defined in the previous article.
-
Click on the OTLP/HTTP exporter. Now, in the "Endpoint" property clear out the old value and press the "@" key and now you'll be prompted with all of the org variables. Select the LOKI_RECEIVER parameter.

-
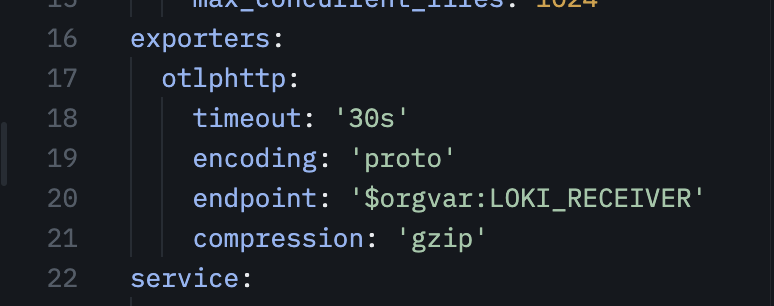
When you choose the "LOKI_RECEIVER" variable, you should see "$orgvar:LOKI_RECEIVER" appear in the Endpoint property, and if you select the YAML tab, you should see it injected in the YAML.
-
Click the save button and you'll be prompted to create a new version. That's because @V1 is already published and cannot be modified, but we can create a new version (@V2) and publish it. Confirm the creation of a new version, and then publish it.
Congrats, you've now parameterized your YAML endpoint and published the Configuration to V2. Additionally, we have an Org Variable defined with 2 different values:
- The default value assigned to the variable: http://10.211.55.73:3100/otlp
- The Prod group override: http://10.211.55.75:3100/otlp
Now let's assign this parameterized YAML to two different deployments.
Step 4: Deploy the Parameterized YAML to Dev
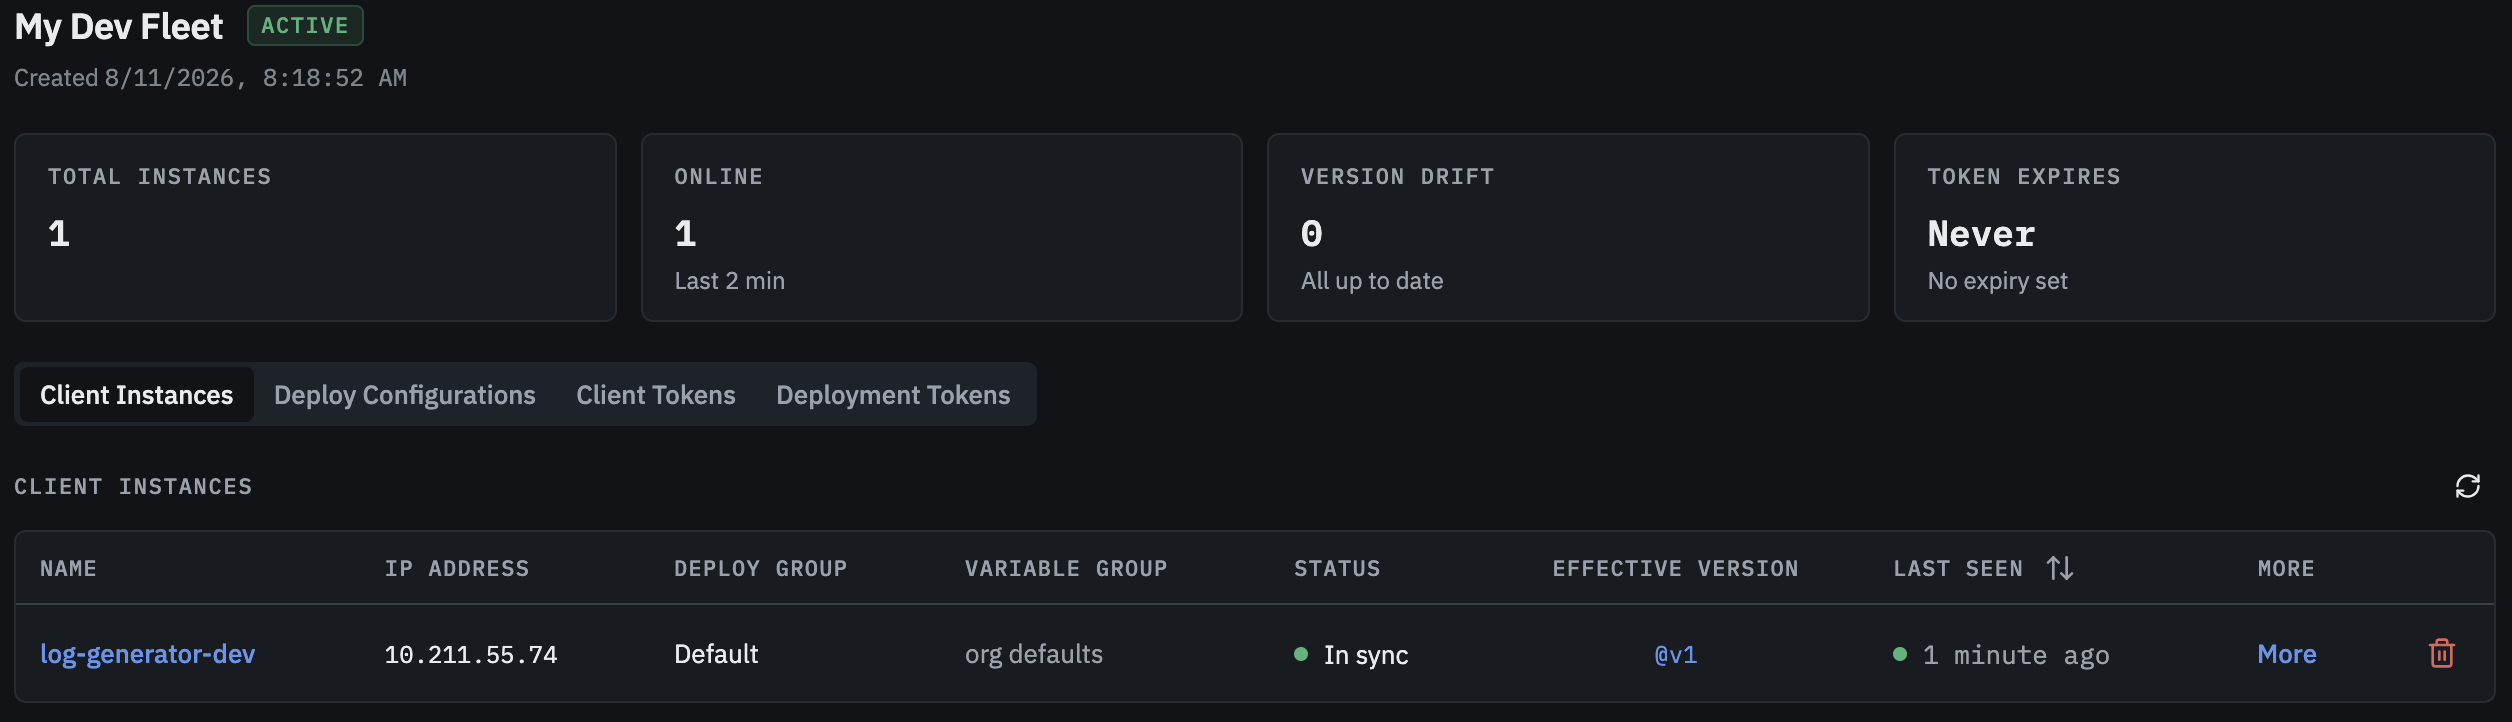
Return to the Fleet page and click on the "My Dev Fleet". You should see the previously executing log-generator-dev instance polling as it did before. Notice that it has the effective version of @V1. We've just parameterized our version as @V2, let's go ahead and swap that out.
-
Click on the "Deploy Groups" tab to find your existing deploy group.
-
Click the "Edit" button.
-
Change the selected Version to @V2.
-
Leave the "Assigned variable group" at "None (org defaults only)", ignore the Read/write paths list and the Installing with Docker? Add volume mounts button below it (volume mounts apply to Docker installs only; a bare-metal collector reads these paths directly), and click "Save". From the terminal,
telflo deploy --fleet <fleet-id> --config <configuration-id> --version 2makes the same change, because this is the only deploy group serving the configuration; the CLI cannot set a variable group, so the prod deploy group in Step 5 below stays in the web app. By leaving this unselected we're telling telflo "Use the default values on any parameters" and because we set the default value to point to our dev Loki receiver, it should still align and work as expected.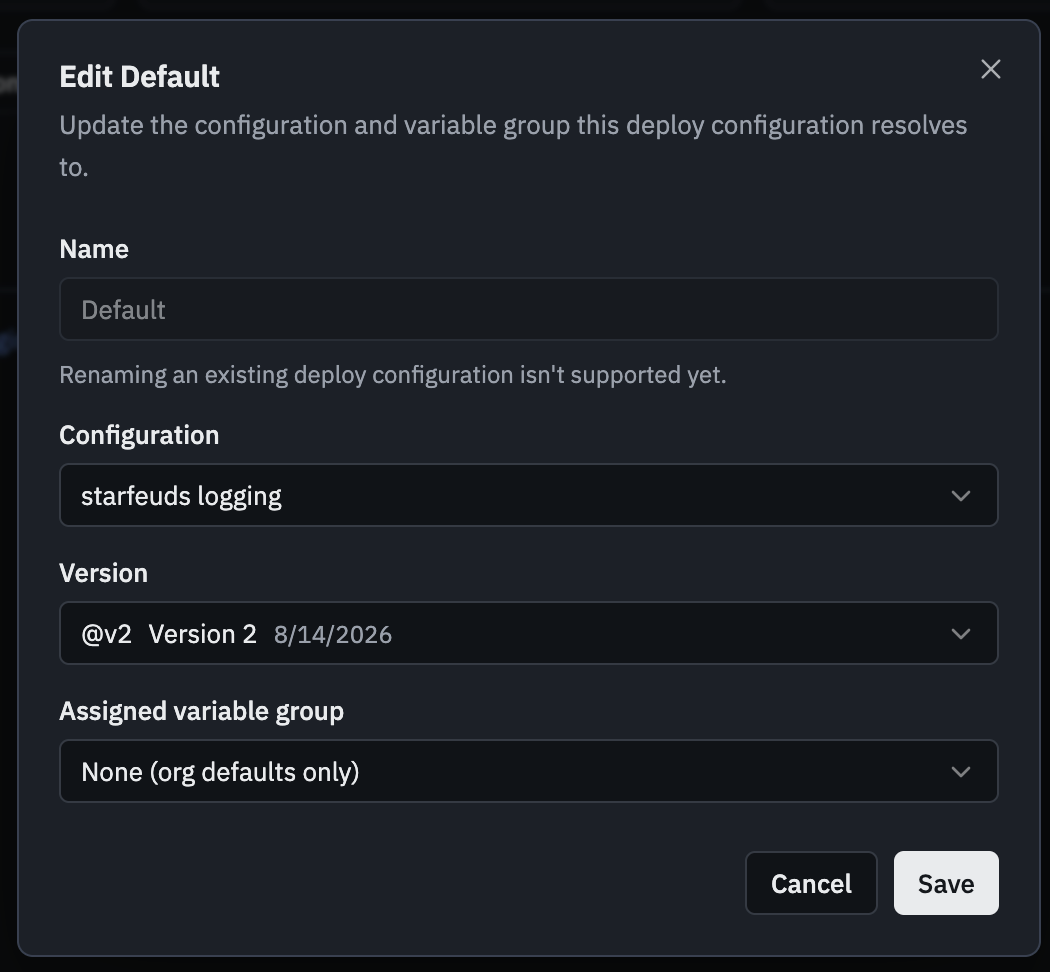
Hop back over to the "Collectors" tab and you should see that your collector is pending pickup.

The OpAMP message exchange is underway and soon you're collector will be running the new configuration. In just a minute that status should resolve and switch back to green and report as "In sync".
-
Once the status is "In sync", refresh your "http://localhost:3001" Dev Grafana instance. You should see logs still flowing in which means that the parameterized YAML worked (or at least didn't break anything). Now the really exciting part. Let's deploy our Prod instance.
Step 5: Deploy the Parameterized YAML to Prod
We've already deployed to Dev and everything is working as expected. Let's create a prod deployment.
- Return to the "Deploy Groups" tab.
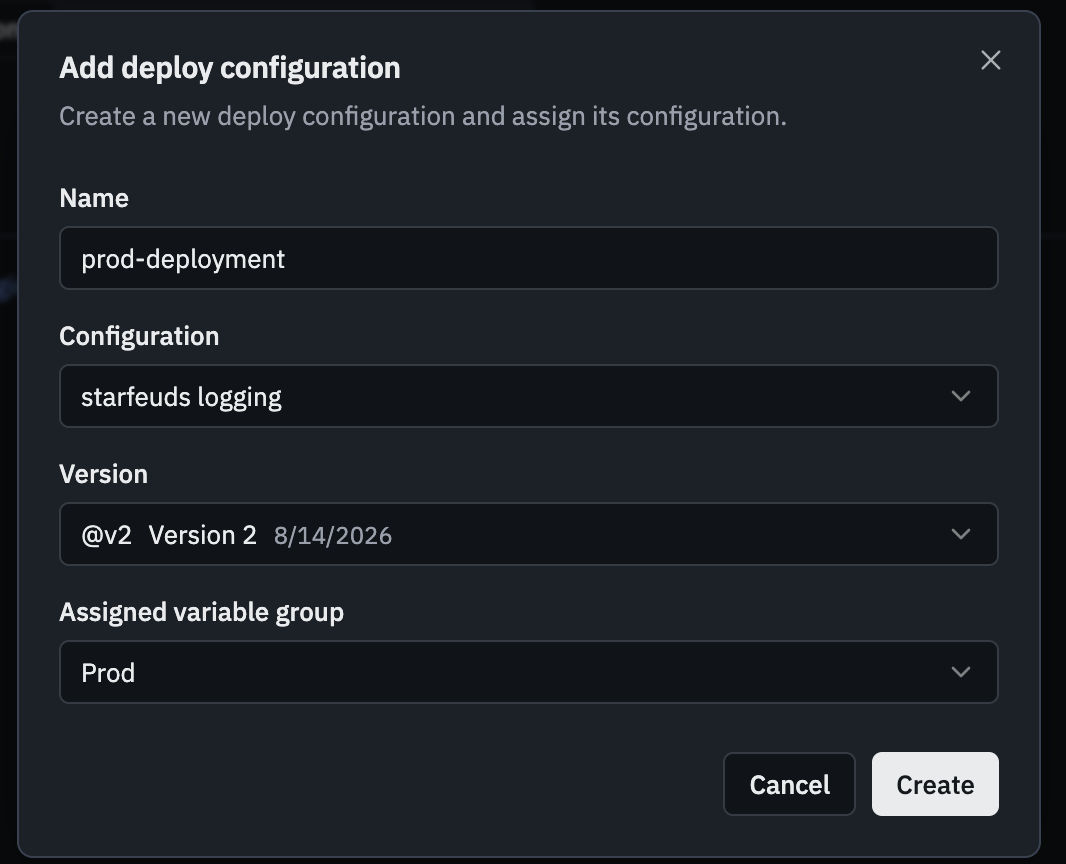
- Click the "New deploy group" button and give the group a name such as "prod" (a group can't be renamed later).
- Choose the "starfeuds logging" Configuration and select @V2.
- Choose the "Prod" option in the "Assigned variable group" dropdown, leave the Read/write paths list and Installing with Docker? Add volume mounts alone, and click "Create". This is a big step; it's telling telflo, "Hey,
when a collector phones home override any parameters in the YAML you return with the Prod group values!".
- When done, you should see the new deploy group. Go ahead and click "Install" on it, choose the "Server: All In One" Platform matching your chip architecture, and click "Quick Deploy".
- Just like we deployed in the previous article, copy the Quick Deploy instructions, locate your log-generator-prod ssh, paste the copied command, and press enter.
- Return to your "Collectors" tab and you should see the new collector register, with "Prod" in its "Variable Group" column.
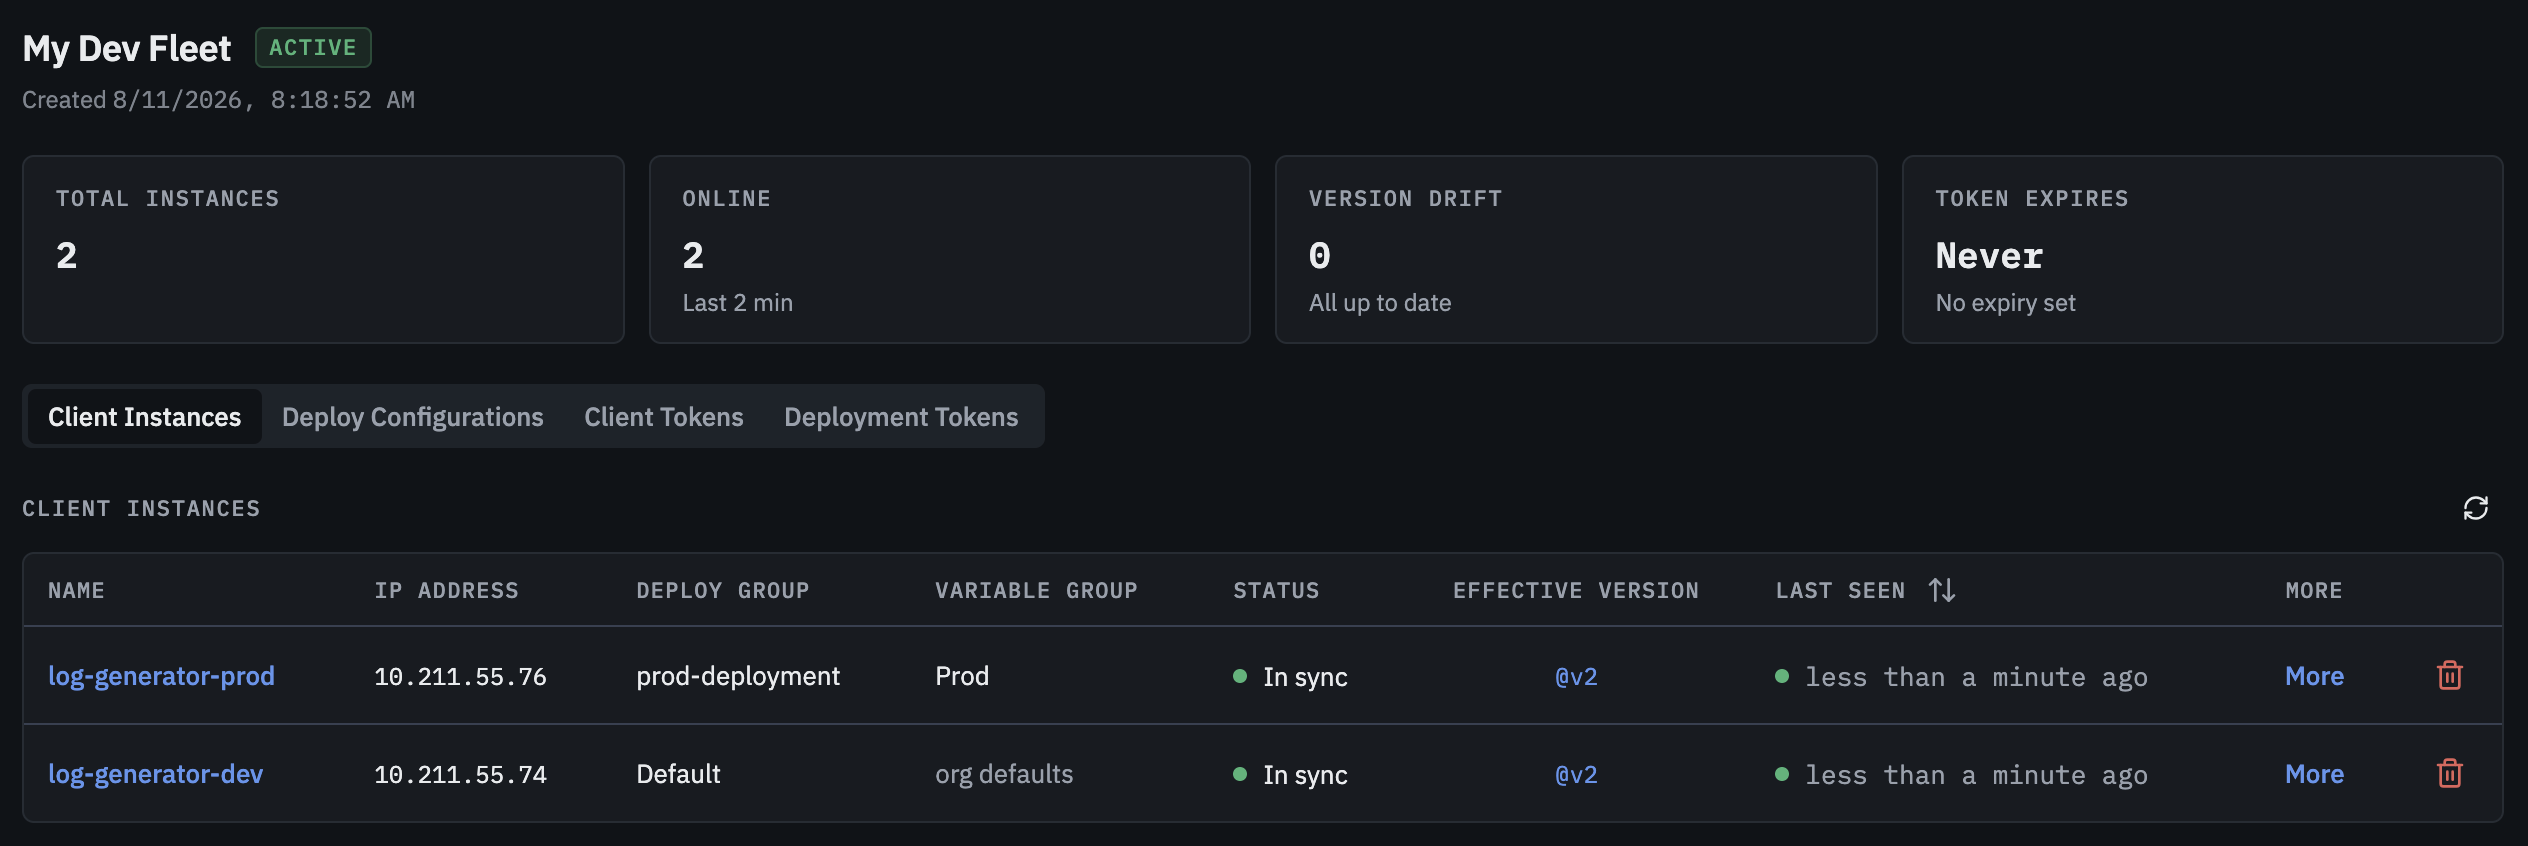
And now...for the moment of truth! Refresh your "http://host:3002" Grafana instance.
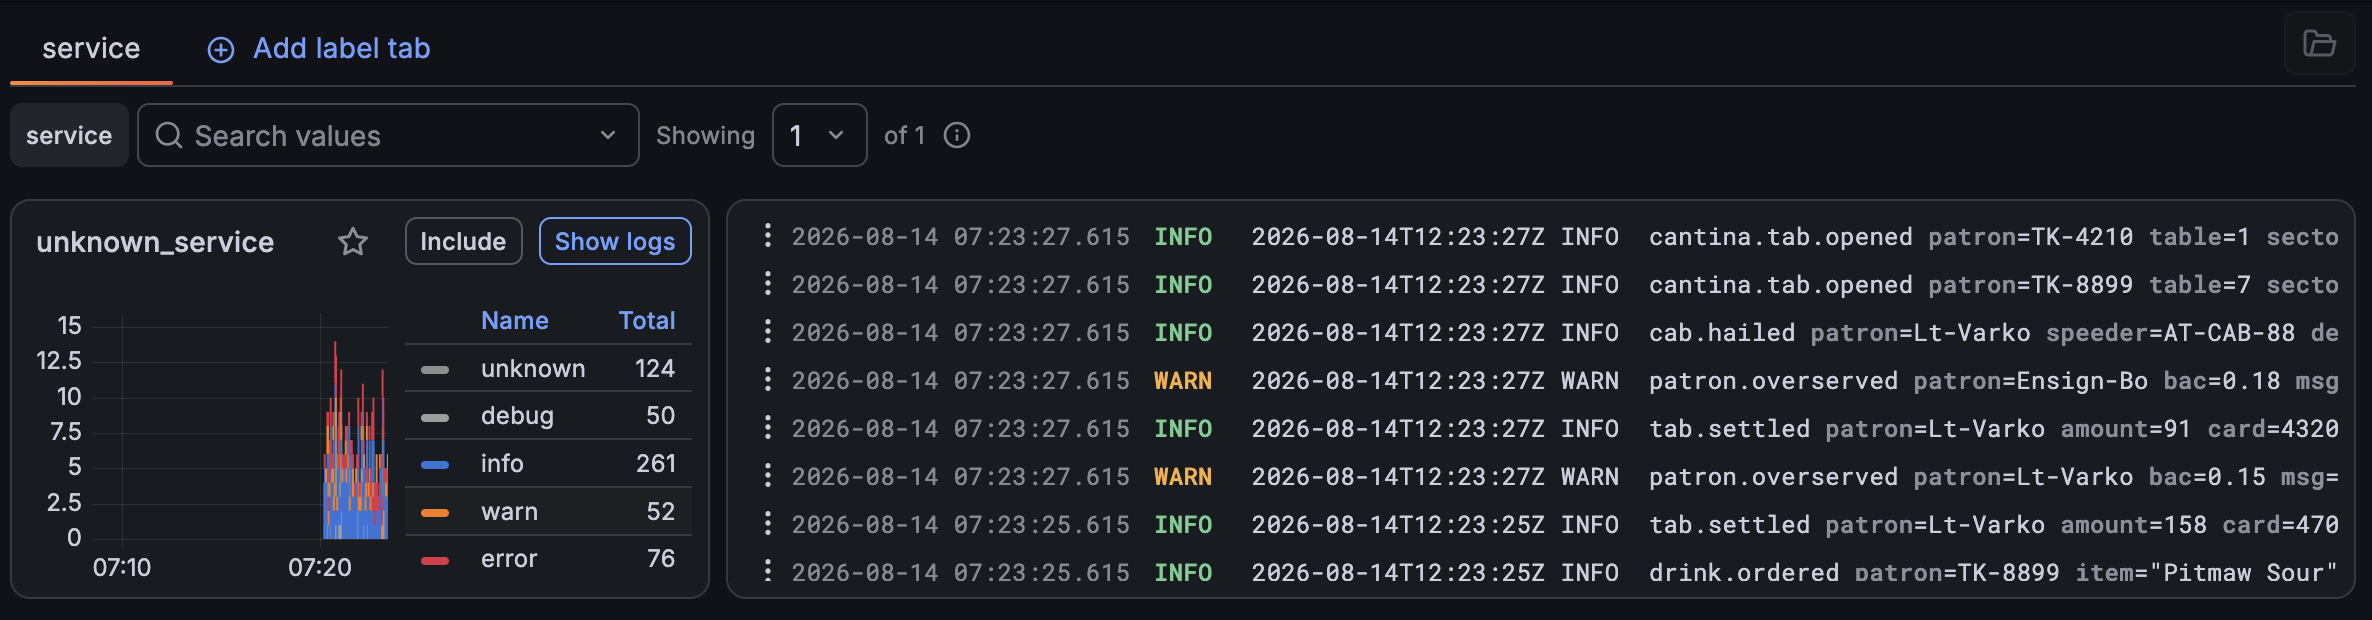
Logs...Logs...Glorious Logs!
Conclusion
That's it! You now have a single YAML configured with parameters that can be swapped into multiple deployments. Think about the power of that. You can test one Configuration Version, get it all cleaned up and ready the way that you want it, and then deploy the exact same YAML to different machines without worrying that you've introduced drift. You can experiment with parameterizing other properties as well: cache sizes, timeouts, and whatever your heart desires.
And just like in the previous article this is a playground to learn so get your hands dirty, break things, fix things, and enjoy learning the power that OpenTelemetry + telflo brings to your organization!
Thanks, see you soon!
Last updated on